I'm currently setting up a Synology dual disk NAS unit.
Synology comes with a client application called Synology Assistant that connects the NAS server to your machine so that it can be accessed using a web administration application (webman).
Webman allows you to upload files from your computer to a number of reserved directories; music, pictures, and video. I uploaded my pictures first and that went well-enough.
But when I uploaded music files to the NAS, things started getting flaky. One problem is that I have a machine with an IDE primary drive and filesystem. My music directory is on the secondary SATA drive not on the primary. Using Firefox 4.0.1, the webman interface refuses to recognize the SATA drive.
So I moved some files to a directory on the IDE drive just to test the critter. Sure enough I could upload music files to the NAS 'music' directory. But just about any interruption of the upload process such as switching tabs would cause a browser crash.
I decided to create a Symlink to the SATA music directory on the IDE drive. Firefox refused to acknowledge it.
So I tried Google Chrome. Chrome not only recognised the symlink but crashed far less frequently.
Then a funny thing happened. Webman refused to open the music directory on the NAS. I got 'Failed Operation' messages. Oddly enough, I could create a sub-directory under music to upload music files to but the music directory looked empty otherwise. I'm still trying to unravel this mystery.
However, I tried to get to the NAS from my Android Thunderbolt phone. The default Android browser failed to connect to the NAS server. I tried the Firefox browser and it worked fine. Not only that, when I accessed the music directory Firefox revealed the missing music files on the music directory. Very strange behavior. Webman appears to be buggy.
Showing posts with label Ubuntu Best Practice (UBP). Show all posts
Showing posts with label Ubuntu Best Practice (UBP). Show all posts
Sunday, May 15, 2011

Wednesday, July 15, 2009
Development on Ubuntu: GWT on NetBeans on Jaunty
My goal is to get a decent Google Web Toolkit (GWT) development environment installed on Jaunty and I played around a bit with this over the past few days. Although Eclipse is a fine IDE, it is a bit kludgey on Ubuntu and GWT was a bit of a headache.
Secondly, I didn't like GWT being that tightly bundled. While working at General Dynamics Advanced Information Systems, I got to use NetBeans more intimately than ever before and found that I liked it as a lighter weight alternative to Eclipse. In fact, for many things, NetBeans was just a cleaner IDE.
And that's what I've found out on Ubuntu as well. Eclipse and GWT are still a bit awkward but GWT on NetBeans 6.7 at first glance is cleaner and gives GWT an autonomous separation than Eclipse while still offering a nice seamlessly integrated IDE.
So let's roll with that.
Step 1.) Get Netbeans from the SUN site. You can get it via Synaptic but we want the latest and we want the Java/Glassfish (2.x) bundle that also includes Apache Tomcat.
Glassfish is a reference server worth running as we develop. (At this writing) Included in this bundle is the Prelude Glashfish v.3. We'll not mess with this at all for the time being so you can ignore it and avoid downloading it if possible.
Unbundle all of this in your home directory or whatever your using as a development sandbox.
Step 2.) Let's grab GWT 1.x from the Google site as well. GWT does not currently show up in the Synaptic Package Manager.
Now with something like GWT, a best practice that I try to exercise with frameworks, utilities and odd tools is to create a directory at my home directory called 3rdPartyTools. It creates a one-stop location for certain jar files, libraries, or points of interest.
Conceptually it becomes a handy junk drawer.
Unbundle GWT there.
Step 3.) In Netbeans, we need to set up GWT.
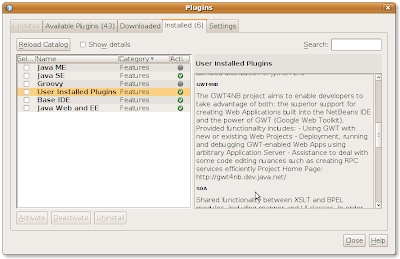
Open NetBeans. Go to the Main Menu, click Tools -> Plugins -> and check Java ME, Java SE, Groovy, User Installed Plugins, Base IDE, and Java Web and EE plug-ins as a minimum.
Install whatever else you may want.
Secondly, I didn't like GWT being that tightly bundled. While working at General Dynamics Advanced Information Systems, I got to use NetBeans more intimately than ever before and found that I liked it as a lighter weight alternative to Eclipse. In fact, for many things, NetBeans was just a cleaner IDE.
And that's what I've found out on Ubuntu as well. Eclipse and GWT are still a bit awkward but GWT on NetBeans 6.7 at first glance is cleaner and gives GWT an autonomous separation than Eclipse while still offering a nice seamlessly integrated IDE.
So let's roll with that.
Step 1.) Get Netbeans from the SUN site. You can get it via Synaptic but we want the latest and we want the Java/Glassfish (2.x) bundle that also includes Apache Tomcat.
Glassfish is a reference server worth running as we develop. (At this writing) Included in this bundle is the Prelude Glashfish v.3. We'll not mess with this at all for the time being so you can ignore it and avoid downloading it if possible.
Unbundle all of this in your home directory or whatever your using as a development sandbox.
Step 2.) Let's grab GWT 1.x from the Google site as well. GWT does not currently show up in the Synaptic Package Manager.
Now with something like GWT, a best practice that I try to exercise with frameworks, utilities and odd tools is to create a directory at my home directory called 3rdPartyTools. It creates a one-stop location for certain jar files, libraries, or points of interest.
Conceptually it becomes a handy junk drawer.
Unbundle GWT there.
Step 3.) In Netbeans, we need to set up GWT.
Open NetBeans. Go to the Main Menu, click Tools -> Plugins -> and check Java ME, Java SE, Groovy, User Installed Plugins, Base IDE, and Java Web and EE plug-ins as a minimum.
Install whatever else you may want.

Friday, July 3, 2009
Ubuntu First Things: Archive as Root
Another nuisance thing in Ubuntu for developers or power users is the inability to just extract something to the /opt or whatever root-protected destination.
As we did with the RootEdit exercise, we will now create an Ubuntool that allows us unfettered access to the directory structure.
Step 1.) Right-click on the Ubuntu Main Menu panel -> Applications. On the drop-down menu, click Edit Menus.
Step 2.) In the Main Menu configuration window, click the previously-created UbunTools menu item. You can also use the Other menu item if you aren't doing the cumulative exercise.

Click the New Item button.
Step 3.) Once again we're going to create a new launch item.
This time we'll call it RootZip and the command will be; gksu file-roller %U

Click OK and the command is added to the UbunTools menu.
With it you will now be able to extract files wherever you like. That means you should think before extracting.
As we did with the RootEdit exercise, we will now create an Ubuntool that allows us unfettered access to the directory structure.
Step 1.) Right-click on the Ubuntu Main Menu panel -> Applications. On the drop-down menu, click Edit Menus.
Step 2.) In the Main Menu configuration window, click the previously-created UbunTools menu item. You can also use the Other menu item if you aren't doing the cumulative exercise.

Click the New Item button.
Step 3.) Once again we're going to create a new launch item.
This time we'll call it RootZip and the command will be; gksu file-roller %U

Click OK and the command is added to the UbunTools menu.
With it you will now be able to extract files wherever you like. That means you should think before extracting.
Ubuntu First Things: Edit as Root
For most users Ubuntu works just fine out of the box and casual users can use the internet wirelessly, edit using OpenOffice, and so on with little or no problems.
But occasionally, users need to edit files protected by root user access. For developer's and power users this is always the case.
The most elegant solution I've found for this is adding a menu item that launches gedit in root mode.
Step 1.) Right click on any drop down menu label of the main panel (say, Applications). The second menu item is: Edit Menus.
Step 2.) Click Edit Menus. It pops up the following window:

In the column called Menus under Applications, click on the entry called Other.
Now click the New Item Button. We're going to add a gedit launcher that offers root access to files.
In the Create Launcher window, we add the command gksu gedit and give the command a Name that's descriptive such as RootEdit.

Click the OK button. You have successfully added a command called RootEdit (or whatever you decided to call it) as an executable command that will be listed in the Applications menu.

Optional Step) The next thing we'll do is create a new menu called UbunTools.
First click on Applications.
Click New Menu and fill in the blanks as shown or to your liking, then click OK.

You will see UbunTools added to the Menus column in the Main Menu window.
Click on the Other menu item. Drag and Drop our newly created RootEdit command to the UbunTools menu.

Once you successfully drag and drop it to the UbunTools menu, you can delete it from the Other menu by highlighting it and clicking the Delete button.
Step 3.) Close the Main Menu window.
The Applications menu now contains a menu item Called UbunTools that has a RootEdit command that launches gEdit with Root privileges so that you can edit protected files.
WARNING and RULES! a.) Before editing protected files be sure that the instructions you are being given make sense and have been verified by others!
In other words, read everything you can before acting. One person's medicine is another's poison.
Most importantly, SAVE THE ORIGINAL FILE in a backup state. Prefix or postfix the saved filename with something like orig or safe or backup.
Lastly, if you are in over your head technically, don't try to edit protected files, you will regret it.
But occasionally, users need to edit files protected by root user access. For developer's and power users this is always the case.
The most elegant solution I've found for this is adding a menu item that launches gedit in root mode.
Step 1.) Right click on any drop down menu label of the main panel (say, Applications). The second menu item is: Edit Menus.
Step 2.) Click Edit Menus. It pops up the following window:

In the column called Menus under Applications, click on the entry called Other.
Now click the New Item Button. We're going to add a gedit launcher that offers root access to files.
In the Create Launcher window, we add the command gksu gedit and give the command a Name that's descriptive such as RootEdit.

Click the OK button. You have successfully added a command called RootEdit (or whatever you decided to call it) as an executable command that will be listed in the Applications menu.

Optional Step) The next thing we'll do is create a new menu called UbunTools.
First click on Applications.
Click New Menu and fill in the blanks as shown or to your liking, then click OK.

You will see UbunTools added to the Menus column in the Main Menu window.
Click on the Other menu item. Drag and Drop our newly created RootEdit command to the UbunTools menu.

Once you successfully drag and drop it to the UbunTools menu, you can delete it from the Other menu by highlighting it and clicking the Delete button.
Step 3.) Close the Main Menu window.
The Applications menu now contains a menu item Called UbunTools that has a RootEdit command that launches gEdit with Root privileges so that you can edit protected files.
WARNING and RULES! a.) Before editing protected files be sure that the instructions you are being given make sense and have been verified by others!
In other words, read everything you can before acting. One person's medicine is another's poison.
Most importantly, SAVE THE ORIGINAL FILE in a backup state. Prefix or postfix the saved filename with something like orig or safe or backup.
Lastly, if you are in over your head technically, don't try to edit protected files, you will regret it.
Subscribe to:
Posts (Atom)