Last week I switched out my old phone for the HTC Thunderbolt. I had planned on waiting for the Bionic but quite frankly I was tired of waiting and I'm fairly convinced some other model would be even more compelling (with more waiting).
And the only trepidation I had about the purchase were the pernicious rumors that the battery would be problematic. And by problematic I mean to say that the battery would quickly exhaust itself.
So one of the first things I did was fully charge the battery before using the phone. And after a few days of use, I conducted an experiment to see how long it would take to exhaust the battery under normal conditions for me (phone calls, occasional surfing, and poking around on the internet).
I took the phone off the charger at about 7 a.m. on Wednesday and left it on continuously - using it as I normally would. On Thursday evening, after about 40 hours of use the phone displayed the message that it needed recharging because the battery was 15% or below charge capacity.
At the office this raised a few questions. First it was observed that the phone was using 3G, not 4G. And speculation mounted that maybe the 4G components would drain the battery faster and less efficiently. This remains an open question.
The phone in 3G operational mode is extremely fast and impressive.
Update: I took my phone to New York City for a weekend recently and the battery under a heavier urban load lasted from morning till late evening before needing recharging and after a short night's charge only lasted til mid-afternoon the next day before needing recharging.
Once home and with a full charging cycle the phone is once again lasting lasting well into a second day.
Friday, March 25, 2011

Sunday, December 6, 2009
Grub2 - Dual Boot, SATA Drive Problems
Update Dec. 15, 2009
A recent update has once again hosed Grub. The system only comes up in "rescue" mode which is like telling a user to "Go Fish".
Super Grub will boot Ubuntu but the Windows partition is unrecognized. Supergrub will work sporadically so you have to reboot numerous times to get a menu.
IMO, its too early to move to Grub 2 unless you have a very vanilla setup.
Dec. 23 Update
I tried in vain to correct the problems I was having with Grub 2 and repeatedly failed. What I became good at though was recovering using the Supergrub disk.
The final solution that worked was to uninstall Grub2 and then reinstall it, trying only one boot device at a time.
In my case the first boot device failed to work so I uninstalled Grub 2, reinstalled it and tried again. The second boot device worked fine.
Needless to say Grub 2 is an adventure.
DEC. 7, 2009 - Original instructions.
I'm guessing that for many users who have a straightforward single boot Ubuntu system the upgrade from Grub 1.whatever is probably fairly easy.
I run a dual boot, fairly heavy duty machine at home that was hand built. About a year ago I updated the motherboard from an AMD to a P5Q Intel board and outfitted it with a brand new SATA drive.
In order to boot the machine, I found myself having to use the older Maxtor XP drive as the boot drive partitioned awkwardly for Ubuntu and Grub. The SATA drive just gives me huge disk space.
So in reading a recent article about the release of a new, improved grub implementation, I foolishly decided to perform the upgrade procedure as described in an optimistic article [DON'T DO THIS!]:
First the official instructions can be found at the Ubuntu wiki. These are worth reading before following anyone else's advice. But even these instructions have their blind spots.
And speaking of blind spots there are a half dozen recovery instructions that are equally lame and misleading.
What follows are instructions that I hope are both comprehensive and accurate for most complex dual-boot environments and a series of fixes for those of you caught in the errors.
Bios Setup Preliminaries (may be unnecessary for very vanilla machines):
For users with more than one hard drive, you will need to know which hard drive is used to initially boot the machine.
Secondly, you'll need to know if the boot sequence recognizes all the drives. In the case of my SATA drive, it showed up in the bios setup as a drive but was not recognized as a boot device.
This information can be found in the bios setup when you restart the machine (check your motherboard documentation).
If you are already in a GRUB2 error mode, be sure the boot sequence has a CD or DVD or USB bootable device preceding your primary boot drive.
If your machine has a secondary hard drive that does not show up as a bootable device option in bios, shut off the machine, disconnect the power, wait till the motherboard is wholly powered down, and carefully disconnect that drive [this is temporary]. Since the SATA drive isn't recognized by GRUB at boot time, it cannot be allowed to be a factor in our debugging or corrective action process.
Pre-installation Backup Preliminaries:
Before trying to install GRUB2, navigate to the boot disk's boot folder and copy everything in it to a finger drive or removable media. this can prove to be a system saver later.
Installation Instructions and a WTF Rant:
First open a command terminal and run; sudo os-prober. This will identify the /dev/sdxx boot device. For example Ubuntu might be on /dev/sda0. This will later show up in the update grub command sequence.
BTW: the results of this command can differ if the secondary SATA drive is connected. It can add irrelevant and inaccurate results.
As I said before, the most accurate GRUB2 installation instructions are here. And while the instructions are accurate, they describe a procedure that is decidedly user unfriendly and perilous.
The "sudo apt-get install grub2" instructions are intuitive and work fine. However it is the "sudo upgrade-from-grub-legacy" process that defies any sensible logic. The documentation warns;
So let me get this straight. If for some reason I am not privy to this warning, the program goes right ahead and hoses me! Unbelievable!
When the user is actually running this command, nowhere does the stone age program provide this warning nor any instruction of how to make it work! So as a user, if I just hit the enter key assuming the default drive or drives are chosen, I'm not only wrong but thrown into a state of machine anarchy and personal chaos.
The interface used for the GRUB2 activation is entirely unjustifiable. First, if a primitive interface is really necessary, then it should tell the user to use the space bar to pick a boot device [the sdx device os-prober identified]. Secondly, if a device IS NOT CHOSEN then back out gracefully, offer the user a second chance, or simply rename the grub.cfg file to something else so the the user is not thrown into the error abyss.
Climbing out of the GRUB2 error abyss:
A user who tries upgrading to GRUB2 and gets thrown into a non-bootable machine state has a number of remedies. Booting from an Ubuntu install disk will get you back into the machine to poke around. If the disk and directories are still intact then restoring the /boot/ backup material is something that will restore you to your original state.
If you've no backup and gotten lost in corrective actions that don't work, you can burn an iso cd of a program called SuperGrub from here.
Rebooting using SuperGrub can restore your system so that you can go back into the /boot/grub directory and attempt fixing the appropriate files as documented on the Ubuntu wiki.
Making the system whole after correction
Shut off the machine. Disconnect the power. Reconnect any disconnected drives.
A recent update has once again hosed Grub. The system only comes up in "rescue" mode which is like telling a user to "Go Fish".
Super Grub will boot Ubuntu but the Windows partition is unrecognized. Supergrub will work sporadically so you have to reboot numerous times to get a menu.
IMO, its too early to move to Grub 2 unless you have a very vanilla setup.
Dec. 23 Update
I tried in vain to correct the problems I was having with Grub 2 and repeatedly failed. What I became good at though was recovering using the Supergrub disk.
The final solution that worked was to uninstall Grub2 and then reinstall it, trying only one boot device at a time.
In my case the first boot device failed to work so I uninstalled Grub 2, reinstalled it and tried again. The second boot device worked fine.
Needless to say Grub 2 is an adventure.
DEC. 7, 2009 - Original instructions.
I'm guessing that for many users who have a straightforward single boot Ubuntu system the upgrade from Grub 1.whatever is probably fairly easy.
I run a dual boot, fairly heavy duty machine at home that was hand built. About a year ago I updated the motherboard from an AMD to a P5Q Intel board and outfitted it with a brand new SATA drive.
In order to boot the machine, I found myself having to use the older Maxtor XP drive as the boot drive partitioned awkwardly for Ubuntu and Grub. The SATA drive just gives me huge disk space.
So in reading a recent article about the release of a new, improved grub implementation, I foolishly decided to perform the upgrade procedure as described in an optimistic article [DON'T DO THIS!]:
sudo aptitude install grub-pc
Chainload from menu.lst? <-- Yes
Linux Command line: <--enter
Next enter:
sudo upgrade-from-grub-legacy
Here you'll be confronted with a series of questions about which boot device to use.
I simply keyed enter and nothing seemed to happen so I tried a few keys that I thought would work and finally got the program to end.
In rebooting the machine I was confronted with a Grub Error 11: Unrecognized device string
I fixed the Error 11 problem to be confronted with an Error 15 problem.
I fixed the error 15 problem and wound up with a grub command line terminal that seemed to refuse grub commands.
It took me two (busy) days to recover.
First the official instructions can be found at the Ubuntu wiki. These are worth reading before following anyone else's advice. But even these instructions have their blind spots.
And speaking of blind spots there are a half dozen recovery instructions that are equally lame and misleading.
What follows are instructions that I hope are both comprehensive and accurate for most complex dual-boot environments and a series of fixes for those of you caught in the errors.
Bios Setup Preliminaries (may be unnecessary for very vanilla machines):
For users with more than one hard drive, you will need to know which hard drive is used to initially boot the machine.
Secondly, you'll need to know if the boot sequence recognizes all the drives. In the case of my SATA drive, it showed up in the bios setup as a drive but was not recognized as a boot device.
This information can be found in the bios setup when you restart the machine (check your motherboard documentation).
If you are already in a GRUB2 error mode, be sure the boot sequence has a CD or DVD or USB bootable device preceding your primary boot drive.
If your machine has a secondary hard drive that does not show up as a bootable device option in bios, shut off the machine, disconnect the power, wait till the motherboard is wholly powered down, and carefully disconnect that drive [this is temporary]. Since the SATA drive isn't recognized by GRUB at boot time, it cannot be allowed to be a factor in our debugging or corrective action process.
Pre-installation Backup Preliminaries:
Before trying to install GRUB2, navigate to the boot disk's boot folder and copy everything in it to a finger drive or removable media. this can prove to be a system saver later.
Installation Instructions and a WTF Rant:
First open a command terminal and run; sudo os-prober. This will identify the /dev/sdxx boot device. For example Ubuntu might be on /dev/sda0. This will later show up in the update grub command sequence.
BTW: the results of this command can differ if the secondary SATA drive is connected. It can add irrelevant and inaccurate results.
As I said before, the most accurate GRUB2 installation instructions are here. And while the instructions are accurate, they describe a procedure that is decidedly user unfriendly and perilous.
The "sudo apt-get install grub2" instructions are intuitive and work fine. However it is the "sudo upgrade-from-grub-legacy" process that defies any sensible logic. The documentation warns;
NB! You have to use the spacebar to mark the choice here. DO NOT go on without doing this. It WILL result in your system showing error 15 and being unable to even show a boot menu. If you are running a dual boot system with WindowsXP or Vista, you might have to do additional fixes after upgrading to get it to work.
If this has already happened to you you can fix this by following the directions in the Error 15 section on this page.
So let me get this straight. If for some reason I am not privy to this warning, the program goes right ahead and hoses me! Unbelievable!
When the user is actually running this command, nowhere does the stone age program provide this warning nor any instruction of how to make it work! So as a user, if I just hit the enter key assuming the default drive or drives are chosen, I'm not only wrong but thrown into a state of machine anarchy and personal chaos.
The interface used for the GRUB2 activation is entirely unjustifiable. First, if a primitive interface is really necessary, then it should tell the user to use the space bar to pick a boot device [the sdx device os-prober identified]. Secondly, if a device IS NOT CHOSEN then back out gracefully, offer the user a second chance, or simply rename the grub.cfg file to something else so the the user is not thrown into the error abyss.
Climbing out of the GRUB2 error abyss:
A user who tries upgrading to GRUB2 and gets thrown into a non-bootable machine state has a number of remedies. Booting from an Ubuntu install disk will get you back into the machine to poke around. If the disk and directories are still intact then restoring the /boot/ backup material is something that will restore you to your original state.
If you've no backup and gotten lost in corrective actions that don't work, you can burn an iso cd of a program called SuperGrub from here.
Rebooting using SuperGrub can restore your system so that you can go back into the /boot/grub directory and attempt fixing the appropriate files as documented on the Ubuntu wiki.
Making the system whole after correction
Shut off the machine. Disconnect the power. Reconnect any disconnected drives.
Wednesday, July 15, 2009
Updating Ubuntu on a Dell Inspirion 1010
I bought my son a Dell Inspirion 1010 Netbook and both the machine and Ubuntu have been for the most part great.
I had to clean out a series of Yahoo bloatware programs and I'll write a post soon about building out an Ubuntu installation for a college student.
One glitch I did encounter was that the update manager refused to complete because it encountered an error (System -> Administration -> Update Manager).
After a very responsive call to Dell I was told to open a terminal window and enter:
Once the system was reconfigured by this command, Update Manager worked just fine.
I had to clean out a series of Yahoo bloatware programs and I'll write a post soon about building out an Ubuntu installation for a college student.
One glitch I did encounter was that the update manager refused to complete because it encountered an error (System -> Administration -> Update Manager).
After a very responsive call to Dell I was told to open a terminal window and enter:
sudo dpkg --configure -a
Once the system was reconfigured by this command, Update Manager worked just fine.
Development on Ubuntu: GWT on NetBeans on Jaunty
My goal is to get a decent Google Web Toolkit (GWT) development environment installed on Jaunty and I played around a bit with this over the past few days. Although Eclipse is a fine IDE, it is a bit kludgey on Ubuntu and GWT was a bit of a headache.
Secondly, I didn't like GWT being that tightly bundled. While working at General Dynamics Advanced Information Systems, I got to use NetBeans more intimately than ever before and found that I liked it as a lighter weight alternative to Eclipse. In fact, for many things, NetBeans was just a cleaner IDE.
And that's what I've found out on Ubuntu as well. Eclipse and GWT are still a bit awkward but GWT on NetBeans 6.7 at first glance is cleaner and gives GWT an autonomous separation than Eclipse while still offering a nice seamlessly integrated IDE.
So let's roll with that.
Step 1.) Get Netbeans from the SUN site. You can get it via Synaptic but we want the latest and we want the Java/Glassfish (2.x) bundle that also includes Apache Tomcat.
Glassfish is a reference server worth running as we develop. (At this writing) Included in this bundle is the Prelude Glashfish v.3. We'll not mess with this at all for the time being so you can ignore it and avoid downloading it if possible.
Unbundle all of this in your home directory or whatever your using as a development sandbox.
Step 2.) Let's grab GWT 1.x from the Google site as well. GWT does not currently show up in the Synaptic Package Manager.
Now with something like GWT, a best practice that I try to exercise with frameworks, utilities and odd tools is to create a directory at my home directory called 3rdPartyTools. It creates a one-stop location for certain jar files, libraries, or points of interest.
Conceptually it becomes a handy junk drawer.
Unbundle GWT there.
Step 3.) In Netbeans, we need to set up GWT.
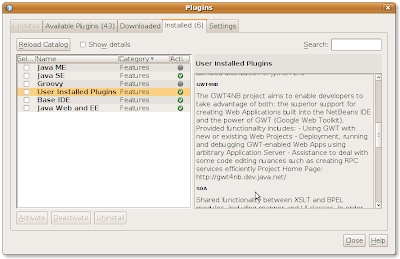
Open NetBeans. Go to the Main Menu, click Tools -> Plugins -> and check Java ME, Java SE, Groovy, User Installed Plugins, Base IDE, and Java Web and EE plug-ins as a minimum.
Install whatever else you may want.
Secondly, I didn't like GWT being that tightly bundled. While working at General Dynamics Advanced Information Systems, I got to use NetBeans more intimately than ever before and found that I liked it as a lighter weight alternative to Eclipse. In fact, for many things, NetBeans was just a cleaner IDE.
And that's what I've found out on Ubuntu as well. Eclipse and GWT are still a bit awkward but GWT on NetBeans 6.7 at first glance is cleaner and gives GWT an autonomous separation than Eclipse while still offering a nice seamlessly integrated IDE.
So let's roll with that.
Step 1.) Get Netbeans from the SUN site. You can get it via Synaptic but we want the latest and we want the Java/Glassfish (2.x) bundle that also includes Apache Tomcat.
Glassfish is a reference server worth running as we develop. (At this writing) Included in this bundle is the Prelude Glashfish v.3. We'll not mess with this at all for the time being so you can ignore it and avoid downloading it if possible.
Unbundle all of this in your home directory or whatever your using as a development sandbox.
Step 2.) Let's grab GWT 1.x from the Google site as well. GWT does not currently show up in the Synaptic Package Manager.
Now with something like GWT, a best practice that I try to exercise with frameworks, utilities and odd tools is to create a directory at my home directory called 3rdPartyTools. It creates a one-stop location for certain jar files, libraries, or points of interest.
Conceptually it becomes a handy junk drawer.
Unbundle GWT there.
Step 3.) In Netbeans, we need to set up GWT.
Open NetBeans. Go to the Main Menu, click Tools -> Plugins -> and check Java ME, Java SE, Groovy, User Installed Plugins, Base IDE, and Java Web and EE plug-ins as a minimum.
Install whatever else you may want.

Friday, July 10, 2009
Getting a KPIG Radio Stream to work in Firefox on Ubuntu
Any software engineer worth his or her salt needs to occasionally give KPIG radio a listen.
Trouble is that clicking on Listen to Stream from http://www.kpig.com produces a pop-up player that can't find the proper plug-in. The issue seems to be that a mmsh (microsoft media server) protocol service is missing.
This is easily resolved by opening a terminal window and getting the vlc firefox plug-in that enables the player.
From the Main Menu panel -> Applications -> Accessories -> Terminal
You may not even need to restart Firefox. The plug-in will work although you may get a confusing player message: Waiting for video.
This is just a harmless message. The audio plays brilliantly.
Trouble is that clicking on Listen to Stream from http://www.kpig.com produces a pop-up player that can't find the proper plug-in. The issue seems to be that a mmsh (microsoft media server) protocol service is missing.
This is easily resolved by opening a terminal window and getting the vlc firefox plug-in that enables the player.
From the Main Menu panel -> Applications -> Accessories -> Terminal
sudo apt-get install vlc mozilla-plugin-vlc
You may not even need to restart Firefox. The plug-in will work although you may get a confusing player message: Waiting for video.
This is just a harmless message. The audio plays brilliantly.
Saturday, July 4, 2009
Ubuntu Apps: Firefox on Steroids
Firefox as it is installed out of the box with Jaunty Jakalope is an anemic instantiation of what we have come to expect from it.
We're going to fix that right now for 64-bit machines. We're going to install the 64-bit version of Adobe's Flash plug-in. This will resolve a number of festering issues that used to plague Firefox on Ubuntu.
Step 1.) Download the Alpha 64-bit version of the Adobe Flash Player from Softpedia. Ignore the instructions found there. We'll give a hat tip to Marius Nestor, the Linux editor at Softpedia for guidance but the instructions there are slightly dated.
First you'll click Download here:
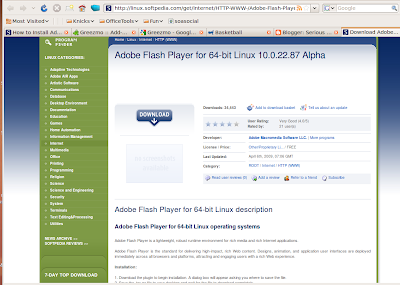
That will take you to a redundant page giving you the ability to finally download the tar file (more or less a zip file). Click Download here as well.
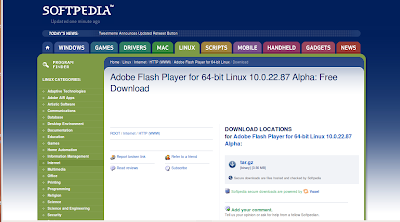
When you're asked what to do with the file, open it with Archive Manager.
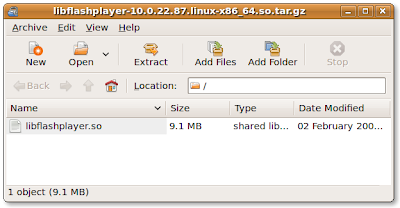
Step 2.) Let's extract this file to the .mozilla directory under our home directory like so:
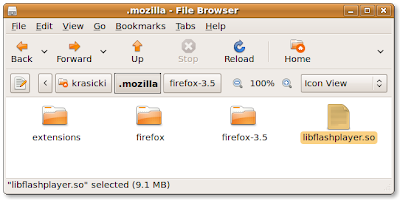
Your directory probably won't (and shouldn't) have the Firefox 3.5 directory in it. You may, however, have a plugins directory.
Close the Archive Manager.
Step 3.) We have to get rid of the existing Adobe Flash solution. From the Ubuntu Main Menu panel click System -> Administration -> Synaptic Package Manager. You'll need to supply your root password.
In the Quick Search locate 'nsplugin'. This will find nspluginwrapper, the plugin solution we're replacing.
Click the checkbox next to nspluginwrapper and mark it for complete removal. Click the Apply button and its gone.
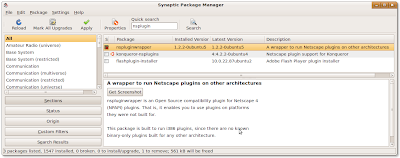
Step 4.) Install the new stuff. From the Ubuntiu Main Menu panel, click Places -> Home Folder. In the Home Folder click the View Menu item and click Show Hidden Files.
Open the .mozilla folder. If there is no plugins directory, create it (all lower case letters).
Then drag and drop libflashplayer.so there from the .mozilla directory.
Restart Firefox. Take the browser for a test drive of video intensive sites.
Assuming you're successful and happy with that upgrade, how about adding a video player to Firefox, say something that plays YouTube videos from a playlist seamlessly in Firefox while you use Firefox for browsing as well?
Step 1.) Go to the Greezmo website.

You'll need to agree to install the experimental version of this application before it let's you download it.
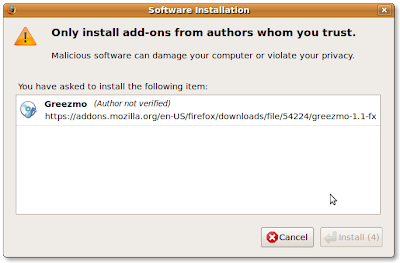
If you agree, then download it.
Step 2.) Greezmo requires one last approval because it is currently unsigned. Once you give it Restart Firefox.
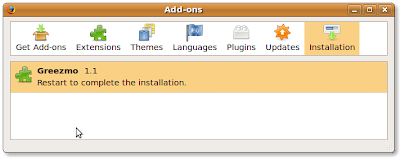
Step 3.) Greezmo installs in the lower right-hand corner of Firefox.
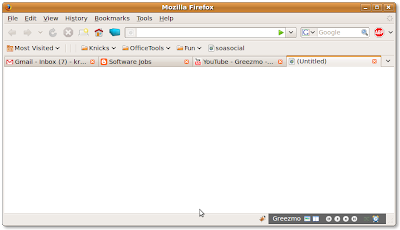
By moving your mouse over the Greezmo icons, you can find and open the 'Manager Panel' that creates a frame along the lower part of Firefox like so:
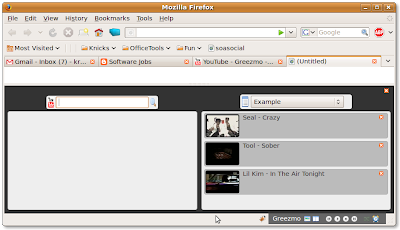
The left panel of Greezmo allows you to specify an artist to find and delivers all their videos there. Dragging and dropping into the right panel adds the video to the playlist.
You can open a video pop-up to entertain you while you work or study. The playlists are controlled by a timer and the Greezmo frames can be later minimized in Firefox.
An elegant and beatifully executed Firefox add-on!
We're going to fix that right now for 64-bit machines. We're going to install the 64-bit version of Adobe's Flash plug-in. This will resolve a number of festering issues that used to plague Firefox on Ubuntu.
Step 1.) Download the Alpha 64-bit version of the Adobe Flash Player from Softpedia. Ignore the instructions found there. We'll give a hat tip to Marius Nestor, the Linux editor at Softpedia for guidance but the instructions there are slightly dated.
First you'll click Download here:

That will take you to a redundant page giving you the ability to finally download the tar file (more or less a zip file). Click Download here as well.

When you're asked what to do with the file, open it with Archive Manager.

Step 2.) Let's extract this file to the .mozilla directory under our home directory like so:

Your directory probably won't (and shouldn't) have the Firefox 3.5 directory in it. You may, however, have a plugins directory.
Close the Archive Manager.
Step 3.) We have to get rid of the existing Adobe Flash solution. From the Ubuntu Main Menu panel click System -> Administration -> Synaptic Package Manager. You'll need to supply your root password.
In the Quick Search locate 'nsplugin'. This will find nspluginwrapper, the plugin solution we're replacing.
Click the checkbox next to nspluginwrapper and mark it for complete removal. Click the Apply button and its gone.

Step 4.) Install the new stuff. From the Ubuntiu Main Menu panel, click Places -> Home Folder. In the Home Folder click the View Menu item and click Show Hidden Files.
Open the .mozilla folder. If there is no plugins directory, create it (all lower case letters).
Then drag and drop libflashplayer.so there from the .mozilla directory.
Restart Firefox. Take the browser for a test drive of video intensive sites.
Assuming you're successful and happy with that upgrade, how about adding a video player to Firefox, say something that plays YouTube videos from a playlist seamlessly in Firefox while you use Firefox for browsing as well?
Step 1.) Go to the Greezmo website.

You'll need to agree to install the experimental version of this application before it let's you download it.

If you agree, then download it.
Step 2.) Greezmo requires one last approval because it is currently unsigned. Once you give it Restart Firefox.

Step 3.) Greezmo installs in the lower right-hand corner of Firefox.

By moving your mouse over the Greezmo icons, you can find and open the 'Manager Panel' that creates a frame along the lower part of Firefox like so:

The left panel of Greezmo allows you to specify an artist to find and delivers all their videos there. Dragging and dropping into the right panel adds the video to the playlist.
You can open a video pop-up to entertain you while you work or study. The playlists are controlled by a timer and the Greezmo frames can be later minimized in Firefox.
An elegant and beatifully executed Firefox add-on!
Ubuntu Crisis: Recovering From the Unthinkable
In the wee hours of last night I was trying to resolve a particularly tricky issue. So in browsing around I found a poster who sounded like he or she knew what they were doing (and this is after I tried a half dozen other prescriptions to resolve the problem).
So I changed a system file, thinking it was no big deal. The problem I was encountering didn't get resolved so I did what is always a last resort and that is, I restarted the system.
My heart dropped when the system arrived at the login and decided to throw an error message. The system just froze. Sometimes completely shutting down the system and rebooting resolves the issue.
No luck. Disaster. I was locked out of Gnome and therefore locked out of Ubuntu!
But my boot loader is grub (and this may apply to other bootloaders as well) and like a Windows system grub comes up with a number of booting options, the second one on the list being to load in safe mode.
So choosing safe mode then offers another set of menu items, the last (on my system) being to start in Root command line mode.
Before we go too far let's just enumerate how to recover from a crisis.
Step 1.) Whenever changing a protected file or files, write down on a slip of paper what you've changed. Too often, users assume that because an editor remembers the last files changed that the editor will always be there! That becomes a real problem when the system dies and you have no tangible breadcrumbs to return by.
Step 2.) Try rebooting and restarting the machine assuming you don't have hardware issues in play (bad motherboard or snap-in components going bad). Maybe this resolves your issue.
If not continue.
Step 3.) Reboot the machine and when you encounter the grub menu of loading options, load using safe mode. Usually this is one menu item below your normal booting choice.
Step 4.) From the safe mode menu, choose to login using the command line. This is a choice that you must sometimes scroll down to find. Your mouse may not work at times but the directional arrow keys should work otherwise you have problems (generally spaeking) that have nothing to do with Ubuntu per se.
Step 5. ) Login from the command line. In this exercise we're assuming that a lost, forgotten, or corrupted password is not the issue (that's a solution well documented in Ubuntu's help guides). you're be prompted for username and password and then be logged in at the command line (usually in the home directory).
Step 6.) This final step is a software engineering exercise (see my short rant on this at the end of this post). From the command line start up the terminal editor called Nano. You'll want to open the very last file you changed back to its original condition. The command to do so is:
For example: sudo nano /etc/uhoh/screwedUpFile
To edit the file, you need to only navigate to the lines that were changed using the arrow keys.
Add previously deleted lines by typing them in the appropriate place. Delete lines by placing the cursor next to the text to be deleted and using the delete key. When you are done fixing the file, hold the control key down while pressing the 'X' key. This will allow you to save the changes.
A nice tutorial on nano is available here.
Step 7.) restart the system in normal mode and hope this resolves the immediate issue of getting back into the Ubuntu and Gnome or KDE environments. If not repeat steps 3 -6 incrementally working backwards correcting changes you made (see rant below).
Captain Obvious Observation: If, in the course of 'fixing' you misspell text, you are still screwed.
If you corrupt the file with bad information, you are still screwed.
Be precise! Nothing else will help.
Software Engineering Rant:
Like a medical doctor, a software engineer must also 'do no harm" but in a different way.
generally speaking, doctors eliminate all or as much of the offending matter as they can to heal a subject. A software engineer approaches the problem incrementally by reverse engineering the very last thing that changed back to an original state.
The system is then retried for stability. If the problem still manifests itself, the software engineer will incrementally reverse-engineer one more unit of change back and so on.
Unlike the human body, computer systems evolve in real-time and have very eccentric possibilities. Fixing a system is very different from healing a human body.
Rant: So why aren't we paid like doctors given the complexity of the task?
Secondly, Joseph Campbell in speaking of the cacophony of dysfunctional religious practice having to do with interpretations of god(s) is quoted as saying (and I'm paraphrasing), "It just goes to show that there's a lot of ways of getting it wrong."
I use the term 'fix' in a very qualified way. There is an ocean or two of working, 'fixed', dysfunctional software out there.
The fact that something 'runs' is no guarantee that it, in fact, works.
The treatment of software professionals in America borders on criminal neglect in pay and in respect! As artificial intelligence solutions flood our lives, citizens should be just as concerned about who wrote their software as about who is their doctor.
It matters.
End of rant.
So I changed a system file, thinking it was no big deal. The problem I was encountering didn't get resolved so I did what is always a last resort and that is, I restarted the system.
My heart dropped when the system arrived at the login and decided to throw an error message. The system just froze. Sometimes completely shutting down the system and rebooting resolves the issue.
No luck. Disaster. I was locked out of Gnome and therefore locked out of Ubuntu!
But my boot loader is grub (and this may apply to other bootloaders as well) and like a Windows system grub comes up with a number of booting options, the second one on the list being to load in safe mode.
So choosing safe mode then offers another set of menu items, the last (on my system) being to start in Root command line mode.
Before we go too far let's just enumerate how to recover from a crisis.
Step 1.) Whenever changing a protected file or files, write down on a slip of paper what you've changed. Too often, users assume that because an editor remembers the last files changed that the editor will always be there! That becomes a real problem when the system dies and you have no tangible breadcrumbs to return by.
Step 2.) Try rebooting and restarting the machine assuming you don't have hardware issues in play (bad motherboard or snap-in components going bad). Maybe this resolves your issue.
If not continue.
Step 3.) Reboot the machine and when you encounter the grub menu of loading options, load using safe mode. Usually this is one menu item below your normal booting choice.
Step 4.) From the safe mode menu, choose to login using the command line. This is a choice that you must sometimes scroll down to find. Your mouse may not work at times but the directional arrow keys should work otherwise you have problems (generally spaeking) that have nothing to do with Ubuntu per se.
Step 5. ) Login from the command line. In this exercise we're assuming that a lost, forgotten, or corrupted password is not the issue (that's a solution well documented in Ubuntu's help guides). you're be prompted for username and password and then be logged in at the command line (usually in the home directory).
Step 6.) This final step is a software engineering exercise (see my short rant on this at the end of this post). From the command line start up the terminal editor called Nano. You'll want to open the very last file you changed back to its original condition. The command to do so is:
sudo nano /whateverDirectoryThatFileIsIn/whateverSubdirectoryThatFileIsIn/corruptedFileName
For example: sudo nano /etc/uhoh/screwedUpFile
To edit the file, you need to only navigate to the lines that were changed using the arrow keys.
Add previously deleted lines by typing them in the appropriate place. Delete lines by placing the cursor next to the text to be deleted and using the delete key. When you are done fixing the file, hold the control key down while pressing the 'X' key. This will allow you to save the changes.
A nice tutorial on nano is available here.
Step 7.) restart the system in normal mode and hope this resolves the immediate issue of getting back into the Ubuntu and Gnome or KDE environments. If not repeat steps 3 -6 incrementally working backwards correcting changes you made (see rant below).
Captain Obvious Observation: If, in the course of 'fixing' you misspell text, you are still screwed.
If you corrupt the file with bad information, you are still screwed.
Be precise! Nothing else will help.
Software Engineering Rant:
Like a medical doctor, a software engineer must also 'do no harm" but in a different way.
generally speaking, doctors eliminate all or as much of the offending matter as they can to heal a subject. A software engineer approaches the problem incrementally by reverse engineering the very last thing that changed back to an original state.
The system is then retried for stability. If the problem still manifests itself, the software engineer will incrementally reverse-engineer one more unit of change back and so on.
Unlike the human body, computer systems evolve in real-time and have very eccentric possibilities. Fixing a system is very different from healing a human body.
Rant: So why aren't we paid like doctors given the complexity of the task?
Secondly, Joseph Campbell in speaking of the cacophony of dysfunctional religious practice having to do with interpretations of god(s) is quoted as saying (and I'm paraphrasing), "It just goes to show that there's a lot of ways of getting it wrong."
I use the term 'fix' in a very qualified way. There is an ocean or two of working, 'fixed', dysfunctional software out there.
The fact that something 'runs' is no guarantee that it, in fact, works.
The treatment of software professionals in America borders on criminal neglect in pay and in respect! As artificial intelligence solutions flood our lives, citizens should be just as concerned about who wrote their software as about who is their doctor.
It matters.
End of rant.
Subscribe to:
Posts (Atom)